In the world of print design, it’s crucial to understand the concept of bleeds and how to properly set them up in Adobe InDesign.
Bleeds are an essential element for ensuring that your printed materials look polished and professional, without any unwanted white borders or misaligned artwork.
In this article, we’ll dive into the concept of bleeds, why they’re necessary in InDesign, and how to set them up correctly.
What is a Bleed in InDesign?
Defining Bleeds
A bleed is an area of your design that extends beyond the trim marks or final dimensions of your printed piece. In other words, it’s the portion of your artwork that “bleeds” over the edges, providing a buffer zone for any slight variations in the cutting process during printing.
When the printed material is trimmed to its final size, the bleed ensures that there are no visible white borders or gaps along the edges.
The Importance of Bleeds
Bleeds are crucial in print design for several reasons:
- Accommodating Cutting Variations: Even with the most precise cutting equipment, slight variations may occur during the trimming process. The bleed area compensates for these discrepancies, ensuring that your design covers the entire printed surface.
- Maintaining a Professional Appearance: Including bleeds in your design ensures that your printed materials have a polished, professional look, free of any white borders or gaps.
- Preventing Misalignment: If a design element is intended to run to the edge of the printed piece, bleeds help avoid any visible misalignments that may result from minor shifts in the printing or cutting process.
Setting Up Bleeds in InDesign
Step 1: Create a New Document
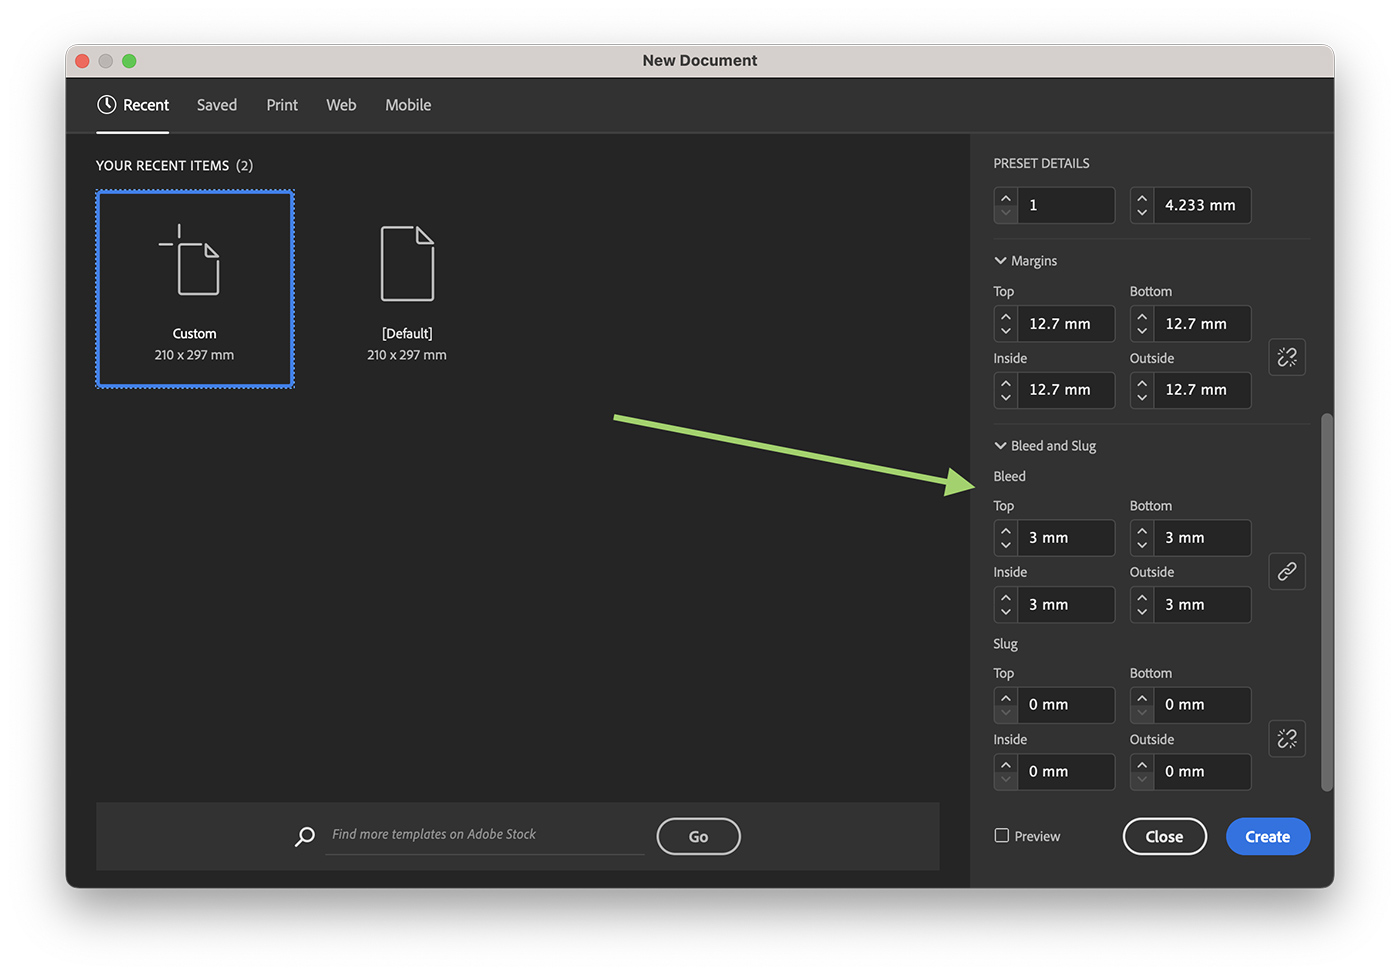
Open Adobe InDesign and create a new document by clicking “File” > “New” > “Document” or using the keyboard shortcut “Ctrl + N” (Windows) or “Cmd + N” (Mac). In the “New Document” dialog box, input the desired dimensions for your document and choose the orientation.
Step 2: Set Up Bleed Settings
In the “New Document” dialog box, locate the “Bleed and Slug” section. If it’s not visible, click the “More Options” button to reveal additional settings. Enter the desired bleed value (typically 0.125 inches or 3 mm) in the “Top,” “Bottom,” “Inside,” and “Outside” fields. Click “Create” to generate your new document with the specified bleed settings.

Step 3: Design with Bleeds in Mind
As you create your design in InDesign, ensure that any elements intended to extend to the edge of the printed piece (such as images, backgrounds, or graphics) reach the bleed area. This step will guarantee that your design elements will seamlessly run off the edge of the page after trimming.
Step 4: Export with Bleeds
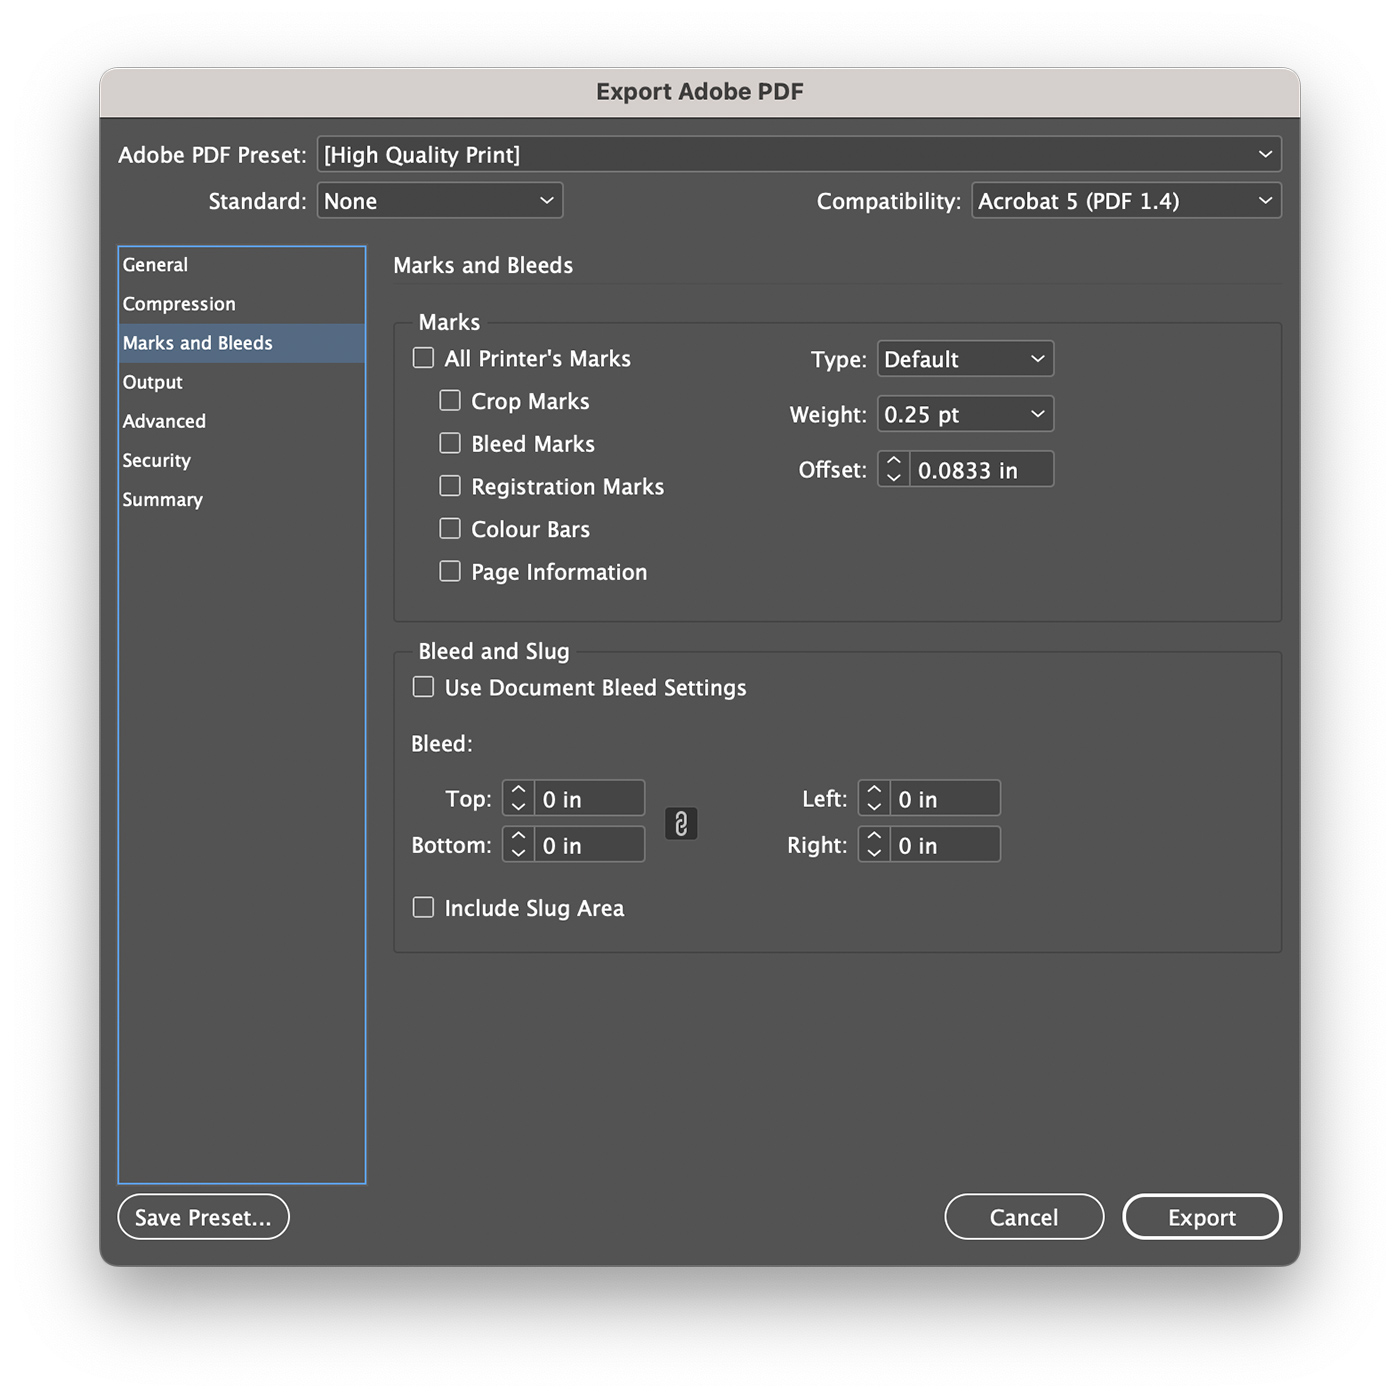
When your design is complete, and you’re ready to export your InDesign file as a PDF, click “File” > “Export” or use the keyboard shortcut “Ctrl + E” (Windows) or “Cmd + E” (Mac). In the “Export” dialog box, select “Adobe PDF (Print)” as the file format.
In the “Export Adobe PDF” dialog box, navigate to the “Marks and Bleeds” tab. Check the box for “Use Document Bleed Settings” under the “Bleed and Slug” section to ensure that your exported PDF includes the bleed area.
If you need crop marks for trimming, check the box for “Crop Marks” under the “Marks” section. Click “Export” to save your InDesign file as a PDF with the specified bleed and crop mark settings.

Checking Your Bleed Settings
Preview Mode
To check if your design elements extend to the bleed area, use the “Preview Mode” in InDesign. Press “W” on your keyboard or click “View” > “Screen Mode” > “Preview” to toggle between the “Normal” and “Preview” modes. In “Preview Mode,” you can see how your design will appear after being trimmed, ensuring that all elements intended to run to the edge of the printed piece reach the bleed area.
PDF Review
After exporting your InDesign file as a PDF with bleeds, open the PDF to review the final output. Check for crop marks, ensuring they are present and correctly placed. Additionally, verify that your design elements extend to the bleed area and that there are no visible white borders or gaps along the edges.
Conclusion
Understanding bleeds and setting them up correctly in Adobe InDesign is crucial for creating professional print materials. By following the steps outlined in this guide, you can ensure your designs will have a polished appearance, free of white borders or gaps, and accommodate any slight variations in the cutting process during printing.
As a designer, mastering the concept of bleeds is an essential skill that will elevate the quality of your print projects and help you deliver impressive results to your clients or colleagues.
0 Commentaires